Whipped Chocolate Ganache Frosting

Most people think that making ganache is a complex process when its actually the easiest icing there is! This my really easy chocolate ganache recipe. It is not the traditional dark ganache that you see on cakes. Its a lighter whipped version which tastes almost like chocolate buttercream! I added more cream, because I wanted a lighter color to complement my Chocolate and Orange Marble Cake. You can ofcourse add more chocolate to make it darker.

Ingredients:

This recipe yields about 1/2 cup whipped chocolate ganache, enough to frost a 20 cm loaf.

50 gms Good quality Dark chocolate (crushed)

50 gms Heavy cream*

*Heavy Cream normally has about 40% fat content. You can’t find heavy creams in India easily, so you can use Amul Cream that’s available readily. Only add 1 tbsp of butter to up the fat content so that you can whip it easily. I wouldn’t…

View original post 205 more words

Chocolate and Orange Marble Cake

Merry Christmas to all of you!!

All I’m thinking these days is about making things that are festive looking and of course not too time consuming ! Baking is perfect, because once the prep is done, its the oven’s job to do the rest and I can just chill! So, today I baked this gorgeous looking chocolate and orange marble cake with a whipped chocolate ganache frosting.This cake was really moist, like all my other cakes 😉 and great tasting!  Oranges and chocolate actually compliment each other really well, the tangy flavor of oranges is complemented by the bitter sweet flavor of dark chocolate. To not ‘overload’ the cake with dark chocolate, I made a really light and fluffy Ganache to frost it with. Delish!

I used a Kinnow, which is primarily grown in India and is really abundant this season. They taste like oranges, only a tad…

View original post 515 more words

Fudgy Chocolate Bars !

Hola my readers!!

Merry Christmas to all of you! It must be a bit early for most of you but I’m in a different time zone, so here’s wishing you a life full of Sugar Spice and All Things Nice! ❤

It’s a festive season and I love to make food to celebrate that! I made these yummy, Fudgy Chocolate Bars full of marshmallows and other good stuff. Quite honestly they look I slaved all day in the kitchen for them but NO, they were surprisingly quick! You can make these bars and refrigerated them. I can’t really say how last they long because mine finished the next day 🙂 Greedy crowd I’ve got here 😉 But they should remain ‘fresh’ for as long as a week. These bars require really basic ingredients but the end result is so mesmerizing and impressive! These bars are a good 4PM snack or…

View original post 339 more words

Sugar ‘n’ Spice by Radhika!

Our sister blog, Sugar ‘n’ Spice by Radhika, is now up and RUNNING!

Sugar ‘n’ Spice’ by Radhika is solely dedicated to one our biggest passions.. Food! If you’re looking for recipes, DIY project ideas and everything related to food or simply share the same passion like us, then follow the blog and get daily updates!

Follow at sugarnspicebyradhika.wordpress.com! See you there!

Sugar 'n' Spice by Radhika  Your daily dose of 'Sugar' 'Spice' and all things 'Nice'! - Google Chrome 12242013 34804 AM.bmp


Guacamole~ Mexican Dip Recipe!

Hello my lovely readers!

To satiate my Mexican craving, I made guacamole today and it turned amazing like always 😉
(To people who don’t know what Guacamole is, it’s a Mexican dip which is pretty much like salsa, only made with avocados which makes the texture really creamy! Its really easy and takes about 5-10 minutes in total to make. It’s a gorgeous dip, my family’s absolute favourite. I’m sure you’ll love it too!

My guacamole beats the cheap supermarket version every time, even if you buy an ‘expensive high quality’ guacamole I’m pretty sure it won’t be as good as an homemade one.

P.S. People from Mexico, I know it’s basic stuff for you, but there are plenty of people out there who still don’t know something as heavenly as Guacamole exists! So accept my apologies when I post a really basic recipe! 🙂

20131217-040655.jpg

So, What are we making?

Quick and Easy Guacamole

What are we using?

2 large Ripe Avocados
1 medium Red Onion Chopped
1 medium Tomato Chopped
1/2 cup Chopped Fresh Coriander
Juice of 1 Lemon
Salt for seasoning

20131217-041746.jpg

What are we doing?
This recipe yields enough dip for 4 people.
Quick tutorial :

20131217-041924.jpg

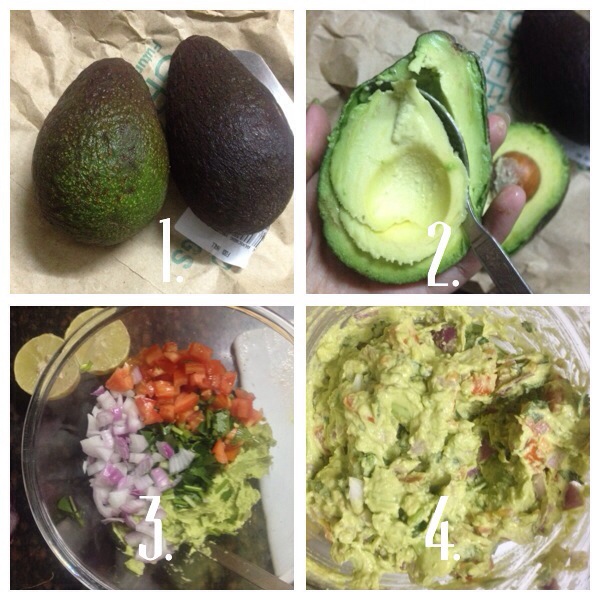
Step 1: Really easy, take 2 ripe Avocados.
Step 2: Cut the Avocados in the middle, they have a stone in the centre so cut alongside it and pull the either sides of avocados apart. As shown in picture no 2, spoon out the insides.
Step 3: Whizz the avocado flesh in a food processor so that it becomes like a paste. Leave out a few pieces here and there. Add in the chopped tomato, onion, coriander, salt and lemon juice.
Step 4: Mix well and it’s done!
Easy Peasy!

Serve your guacamole in a fancy dish with nachos, alongside salsa and sour cream. Perfect game time snack! Or use it as a filling for your fajitas!

You could just take a spoon and simply eat it too! 😀

20131217-042818.jpg

20131217-042918.jpg

Happy dipping!

Love
Radhika xx

YUM Orange Loaf Cake!

Hello my lovely readers,

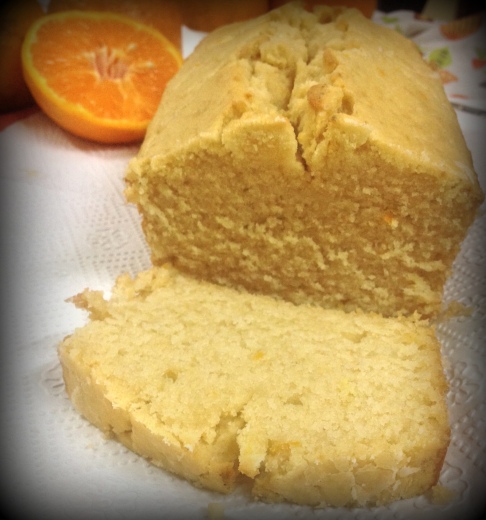
Christmas is approaching, the decorations are up everywhere (even in Delhi!), it’s snowing on my blog but my food preferences are too summery! I don’t know why, but I’m constantly craving for fresh, summery, citrus-ey cakes. Last week I made a really tasty Lemon Loaf Cake and it turned out amazingly good. I saw Rachel Allen baking an Orange cake on her show ‘Rachel Allen Bake!’ and almost instantly started craving it! Unfortunately I didn’t like the way that looked so I thought why not apply my lemon cake recipe to make an orange cake (they’re almost the same thing), so I did and the results were amazing!

All I can say is I made that cake yesterday and there’s none left today! 🙂 Super duper moist and super delicious! On a sidenote: I’ve made eggless cakes all my life but I can say I was foolish to have doubted the role of an egg in baking. Eggs do wonders to the texture! Always use eggs, however,for some reason if you cannot use eggs, I’ve mentioned the alternate too!

If you didn’t try my lemon cake recipe then try this, I’m so sure you will never follow another recipe again!

So, What are we baking?

Orange Loaf Cake

Image

What are we using?

Nothing really, if you’ve got oranges you can start baking right now!

250 gms Flour

125 gms Light Brown Sugar

125 gms Softened Butter

1 tsp Baking Powder

1 tsp Vanilla Essence

2 Large Eggs

Zest of 1 Orange

2 tbsp Orange Juice

100 ml Milk

VEGETARIANS: Use about 1/2 cup pureed banana instead of the eggs.

You will also need a 22 cm loaf tin, butter for greasing your tin and butter paper to line your tin.

What are we doing?

We’re baking THE most awesome cake and for that you need to follow these steps.

Image

Preheat oven at 180 degrees Celsius.

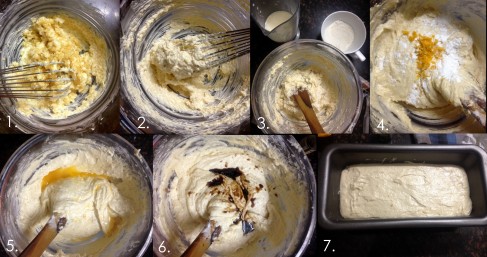
Step 1: In a large bowl, add the sugar to the butter.

Step 2: Whisk until both are combined and the mixture looks light and fluffy (kind of like in picture 2 above).

Step 3: In a separate bowl, sieve the flour and baking powder. In a jar, pour the milk and whisk the eggs in it. Now add both these mixtures to the butter mixture you made in step 2, little by little, until it form a batter.

Step 4: Add in the orange zest.

Step 5: Add in the vanilla essence.

Step 6: Add in orange juice.

Step 7: Transfer to a greased tin and bake for 27 minutes at 160 degrees or until the cake is golden on top and the skewer comes out clean.

P.s I say that because every oven is different, my oven sometimes takes longer than what the recipe demands, for example my Christmas special chocolate chip cookies. I say keep peaking into your oven, DO NOT OPEN THE OVEN DOOR, just peak. When you think the cake is done, take it out for a skewer test.

This cake is done when its a little golden on the top. Don’t wait for it to brown.

This recipe will yield a 20-22 cm loaf, serves 6-8 people. In my house, 10-15! 😀 We like to share!

Image

Enjoy this cake the way I do, with some TEA on a sunny afternoon! 😀

Image

You can save this cake for upto a week (not that you’ll need to, it will be finished in a day or two!) Wrap a little butter paper to keep the moisture intact.

Image

Happy Baking!!

Love,

Radhika xx

South Indian Green Chicken Curry with Steamed Basmati Rice! P.s. Vegetarian Option Also Available :D

Hello my lovely readers!

I’ve been doing a lot of baking lately and whatever little I cook and share, is not Indian, so I thought why not share something from my motherland for my international readers so that they can have a taste of India! And my Indian readers who rarely cook can enjoy making and eating this curry too! If there are any more recipes that you’d like me to share, something that you’ve been wanting to make for really long, comment on this post and we will get back to you with the recipe! Nothing better than cooking for my viewers! ❤

I’m sharing the recipe for south Indian style green chicken curry eaten with steamed Basmati rice! It’s a really tangy yet almost creamy, nothing like Thai green curry (if you’re comparing) with lots and lots of fresh coriander in it and just a hint of coconut milk! It’s best eaten with rice and I like my curry with lots of gravy so I add more water than required, but you can add only a little amount and eat this with Chapatis (Indian flatbread) too!

Image

South Indian style green chicken curry! Absolutely delish!!!

So,

What are we making?

South Indian style Green Chicken Curry with Steamed Basmati Rice.

P.s. If you are a vegetarian you can use potatoes instead of chicken or even mixed vegetables! Everything else remains the same!

P.p.s. You can trust this recipe and be assured that this is the authentic way to do it, Source: I’m an Indian! 😉

What are we using?

1/2 kg Raw Chicken (without skin and washed) or Potatoes/Mix vegetables for a vegetarian option

1 Onion Chopped

1 Bay Leaf

1 tsp Coriander Powder

1/4 tsp Turmeric Powder

1 tsp Cumin Powder

1 tsp Black Pepper Powder

1/2 tsp Garam Masala (to learn how to make garam masala click here.)

1/2 tsp Fennel Seeds

1/4 cup Yogurt (or about 30 gms)

1/4 cup Coconut Milk (you can alternate this with heavy cream instead)

2 tbsp Lemon Juice

Salt to taste.

1  tbsp vegetable oil

For the green paste:

1/2 bunch Fresh Coriander or Cilantro

1/4 bunch Mint Leaves

2-3 Green Chillies

1 large Onion

1 tbsp Roughly Chopped Ginger

4-5 Garlic Cloves

What are we doing?

Image

Indian green chicken

Step 1: Marinate chicken in lemon juice, salt, pepper for 30 minutes.

Step 2: Make a smooth paste with the ingredients ‘for the green paste’. You can whizz them up in a food processor with a little water.

Step 3: Heat oil in a wok or any heavy bottomed pan, add fennel seeds followed by bay leaf. Add in the chopped onions and let them brown on medium heat.

Step 4: When the onions start to turn brown, add in the green paste you made in step 2 and cook that for good 6-8 minutes on low heat or until the oil starts to separate from mixture. Make sure you don’t let it cook for too long, the coriander will loose its color.

Step 5: Add the yogurt, turmeric powder, coriander powder, cumin powder and garam masala. Saute for about half a minute before adding the chicken (add the marinade too).

Step 6: Fry the chicken in green paste and spices for about 3 minutes.

Step 7: Add 500 ml of water (or add 1/2 cup if you don’t want any gravy) and bring it to a boil. Cover until the chicken is cooked and oil has separated.

Step 8: Add in the coconut milk or heavy cream and mix well.

Your South Indian style green chicken curry is now ready to be gorged on! Serve it with some steamed Basmati rice or Chapatis!

To learn how to steam basmati rice click here and to learn how to make chapatis click here.

I hope you enjoy making and eating this chicken! If there are any Indian dishes that you may like to know the recipe of, comment on this post and I will get back to you with authentic Indian way to do it!

Much Love,

Radhika xx

Nigella’s Christmas Kitchen and Rachel Allen’s Bake!

Switched on the TV at just the right time! Enjoyed a really old episode of Nigella’s Christmas Kitchen (Her kids look so young!) followed by Rachel Allen’s Bake! I can’t really put into words how much I adore these woman! Nigella doesn’t just cook but the way she describes food, it almost sounds like a food fairy tale, I watch not to learn but to enjoy watching Nigella in the Kitchen and Rachel Allen actually teaches me stuff, I guess I caught the baking fever from her! Love how properly she describes her recipes and to be in her cookery school is my dream!
Nigella made a turkey brushed with butter and maple syrup, Brussel sprouts with pancetta and parsley and chestnuts and roast potatoes (surprisingly she used semolina instead of flour) all looked wonderful, so did she!

20131213-212901.jpg

It’s alright to cheat every now and then in your kitchen! Learnt that from Nigella who served ready made pudding to her guests, but she did flambé it.. And scored all the points! 😉
Smart woman Nigella! *thumbs up*

20131213-215723.jpg

Rachel made an Iced orange cake and followed by spinach, goats cheese and potato tart !
Yum!
Dying to try her recipes!

20131213-215743.jpg

20131213-220339.jpg

You can get all these recipes online or you could wait a few day I’ll get them to you when I make it for you!

Hope you have a great weekend !

Happy cooking!

Love
Radhika xx

Wedding Hair Tutorial

Difficulty level 2/5

Hello my beautiful readers!

I came across this really lovely hair tutorial which I thought would be perfect for a wedding, I’d say for a bride even! Loved the romance in this hairstyle. I can almost imagine myself with this hairstyle on and feeling all Roman-era-princessy!
This hairstyle is pretty basic, given you have a second person with you to help. If you’re a beginner and are doing it all by yourself..I’d say stop and get someone, you don’t wanna be stuck there forever right?

20131212-211023.jpg

Step 1: Divide your hair in 5 sections, not necessarily equal.
Step 2: French braid each section as shown in pictures 2, 3 and 4 and secure the ends with a rubber band.
Step 3: Pull out the braids a little from all 5 of them to give it volume.
Step 4: Take the end of the centre braid and fold it inwards and pin it up. Repeat for all 5 braids, only fold them towards the centre braid so that they all are pinned at the same spot.
Secure any loose hair with bobby pins. Leave a few fringes for that romantic look and spray your hair with a good hairspray and Voila! You’re done!

Hope you enjoyed this tutorial, do try it and let us know what you thought about it.

Love
Radhika xx

Burberry Heart Collection- Love at First Sight <3

Just checked out Burberry’s website a few days back and saw this entire range of beautiful bags and apparels with heart prints! Now I know what love at first sight must feel like… ❤ Check out the Burberry heart collection here and fall in LOVE!!!

20131212-203220.jpg

Love this Crush bag in heart prints

burberry-prorsum-rtw-fw2013-runway-19_150620920230_zpsed6d043a

Look at the bag!

rita-ora-new-york-city-burberry-prorsum-rubber-pencil-skirt

Rita Ora in Burberry hearts!

BUR0209.450x675 burberry2 burberry-aw13-heart-shirt

burberry-prorsum-rtw-fw2013-runway-02_150606291115_zps9d494ff0 burberry-prorsum-rtw-fw2013-runway-04_150608696853

Now I know many girls would instantly fall in love with this collection..Guys..Not so much! But really, this man is rocking the heart collection! Too British..Almost boy-bandish.. !

487_aw13_mw_prorsum_look_38

Looking dapper in hearts!